Walking Animation for Beginners: Easy Steps to Animate a Walk Cycle
Walking: a simple human function. But how easily is this mirrored in the animating world?
What is a walk cycle?
Welcome to the wonders of the walk cycle: a series of animations that loops endlessly to mirror the motion of a character taking steps. The cycle is repeated over and over, the primary purpose of this being an aversion to animating each step again.
Walk cycles are an integral part of an animator’s learning because this technique is the basis for character animation: from 2D short films to extensive video game storylines and cinematic films.
Character animation can be an arduous task within motion design since it requires an integrated approach based on foundational skill.
The toughest obstacle? Many events are happening all at once and, worse, at the same time. If a character appears unnatural or staggered in their movement, it is unlikely that the viewer will remain engaged for the duration of your video. It is also a daunting fact that if a single mistake is made early in the drawing stage, it can be extremely difficult to rectify later, and you may be at the risk of having to start from scratch.
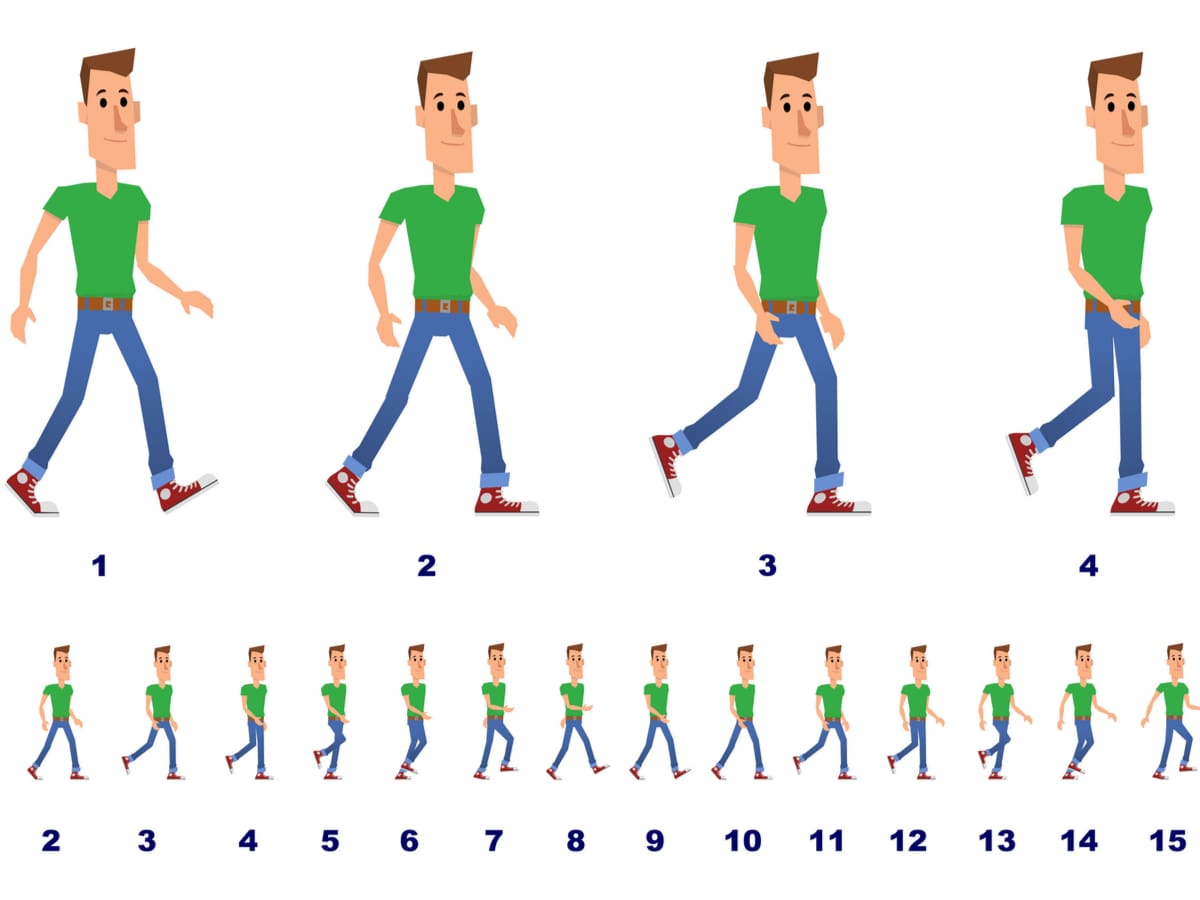
How many frames is a walk cycle?
A walk cycle is traditionally composed of 8 frames of animation. However, more recent walk cycles have been created with fewer or more frames, depending on the style and needs of the project. For example, a walk cycle for a video game might be composed of 12 frames to allow for smoother movement. Ultimately, the number of frames in a walk cycle will be determined by the animator or team creating the walk cycle. On average, in a normal walk cycle animation a character usually takes two steps in 1 second (24 frames)
Key Stages of the walk Cycle
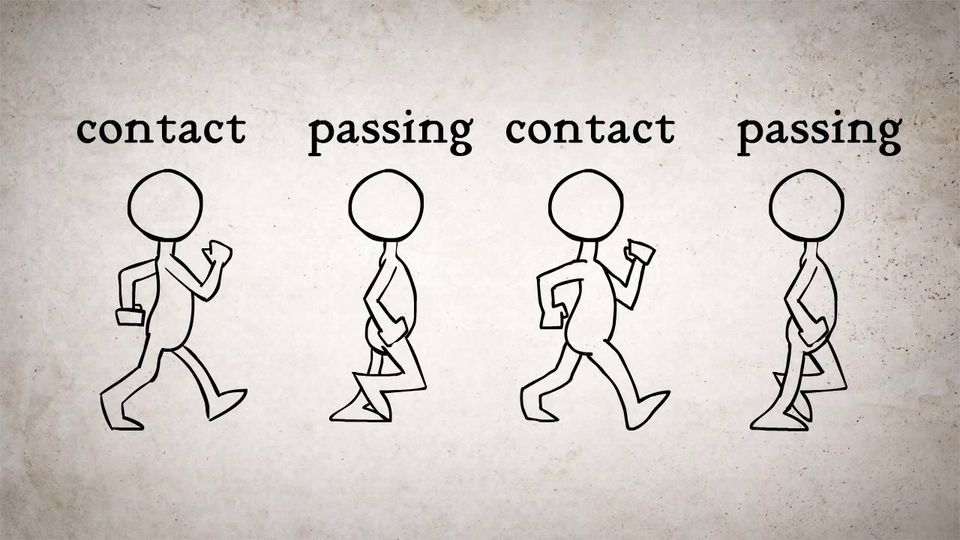
The Walk Cycle can be separated into four basic stages: Forward Contact Point, Recoil, Back Contact Point, and High Point.
The frames are not used in isolation, however. There are also frames drawn in between the key frames. This one is nice and easy, as these are known as the Inbetweens and constitute the rest of the walking cycle. These can be either hand-drawn or interpolated via computer software.
If you take a look at the first pose, the Forward Contact, you will notice some very important details that must be abided by if your walking animation is to be effective:
- The feet are at their furthest extension in the walk, which is their most extreme position in the cycle. This alone makes the Forward Contact Point the single most critical pose throughout the sequence.
- The contact pose is the fundamental foundation of the walking cycle. If you fail to achieve an effect at this step, you may as well stop there.
The second part of the pose is the Recoil Pose or Passing Pose 1:
- This is the frame where the character physically impacts the ground with their feet.
- It is the lowest point of the walking rotation.
- The character’s arms are extended at the furthest point from the body because of the force of the feet hitting the ground.
- The front foot is directly in contact with the ground while the rear foot has just lifted from it.
- The rear foot is directly beneath the body, supporting the weight above it.
- It is a common mistake to produce a recoil pose where the foot is several inches ahead of the body rather than behind it. Try and avoid this at all costs.
The third pose is the Back Contact Point, but for simplification reasons, we can skip this section as it is more or less an in-between.
Upon skipping the third stage, let’s move on to the fourth and final section of the sequence: the High Point or Passing Pose Two:
- Yep, you guessed it. The high point is the highest in the cycle.
- The character’s body is fully extended to its maximum as the walking man lifts his leading leg forward to reach the next contact position.
- The heel of the behind leg is just beginning to lift from the ground.
And there you have it! The four primary poses to walking animation.
The Walking Animation Checklist:
Poses to perfection:
You must NAIL the four aforementioned primary poses:
- Forward Contact Point
- Recoil or Passing Pose One
- Back Contact Point
- The High Point or Passing Pose Two
Without these foundational poses being correct, you won’t be able to progress with the animation.
Mirrored Limbs:
Remember: arms and legs on the same side of the body should always move in opposite phases. This means that when the right leg is in front, the right hand must move backwards.
Negligence in this area will encourage an unnatural and physically impossible motion.
The movement of a body:
In Walking Animation, many compare the figure’s body to a chain reaction since all parts of the sequence are linked together. It is humanly impossible that they move synchronically, that is if you are taking a human approach with your animation.
For this reason, all main movements must start in the pelvis or torso while the rest of the body is “lagging” behind. Motion Design School suggests that hands should be 2-3 frames behind the leg.
Key tip: Always remember that in animation, the path of the body is never a straight line and always an arc. The sole basis of the movement is the point for rotation. For example, the wave of a straight hand is an arc coming from a shoulder joint.
Pay attention to the details:
Always remember other details that convey movement other than the limbs, like head movement, hair, and clothing. After all, you are human, so it shouldn’t be too hard to reflect these types of idiosyncrasies in your animation.
For example: when we walk, our weight shifts from one leg to the other. This causes our body to be constantly moving up and down. Many animators succeed in savvy animation of the body while forgetting to add in an up-and-down bobbing movement for realism.
You don’t want the character to appear weightless, like the they are being pulled while its limbs are dangling aimlessly.
It is important to remember the extra details because forgetting them could cost you all of your hard work in the other steps since they can make or break the realism of the character’s movements.
Added extras:
Remember the position of the character’s feet and hands as well as the main limb movement. These should always be consistently well-animated.
Ironically, our feet are the most active components of the body when it comes to walking and yet tend to be the most easily neglected parts of the animation – often appearing wooden and with little movement. Your character’s foot must be elastic: rising on its toes with the sole following.
Wrapping Up:
If you want to learn even more about the technicalities of Walking Animation, LinkedIn.com provides an excellent access course to 2D Animation: Walk Cycles Basics.
There is also lots more that can be found online into the topic. We hope that this blog post has given you the foundations at least!
Key tip: Always remember that creative animation should never be restricted by stringent rules. If you are after realistic movement as close to humans as possible, then this blog is a good guide. However, animation is a form of expression, and elements can be exaggerated to suit your brand tone of voice and product goals. For example, if you were to use a robotic protagonist.
Fancy creating a 2d animation but don’t fancy taking the time and effort to do it all yourself? We’re here to help!