What is Cel Animation & How Does It Work?
Cel animation is a classic, hand-drawn animation process that consists of drawing and painting 2D objects on celluloid (Cel), a translucent plastic sheet. On average, this technique is played back at a 12 or 24 frames speed to create the illusion of movement. Cel animation was the most common method of creating cartoons before 1990.
This technique requires incredible precision, accuracy, attention to detail, and patience. Before advancements in modern technology, cel animation production would also require an organized team of people with diverging skill sets. As a result, cel animation is used far less nowadays since animators are increasingly reliant on computers.
The question subsequently arises: is cel animation still relevant in today’s modern world of digital marketing?
The honest answer is that it is relatively rare for conventional cel animation to be used in modern productions. Now that everything is digital, traditional hand-drawn animation techniques have slipped through the cracks for reasons such as quality and speed.
Despite adopting many techniques from cel animation, 2D animation is conducted primarily through computer programs. Animators still draw most 2D animations, but digital software speeds up the process.
The Process of Cel Animation
Cel animation can be a lengthy, costly method since it requires the involvement of a large team.
As with many animation processes, it all begins with a script given to a storyboard artist. Once the timing of each shot is established, the head animator will draw preliminary sketches of each significant sketch and note the timing on a pre-determined schedule.
Initially, on paper, a traditional cel animation team will design and sketch the animated frames (also known as roughs) in a series before drawing in every sequence frame in a process known as “inbetweening.”
Each drawing is then inked and colored onto transparent sheets or cels – from which the technique gets its name. These are then photographed sequentially, on top of a painted background.
Character Movement
Each celluloid will display a single frame and represent only a single character movement. When the cels have been painted, they will be independently photographed against a chosen background, frame by frame, to create the finished animation.
When more than one character or object is moving, numerous sheets may be layered over each other. To give perspective, a variety of cels can be managed on different levels.
The ‘dope sheet’ is a crucial element of the process. It determines the length of time a specific movement takes and controls the position of the cels. Once the major poses are sketched out and the dope sheet is completed, animators will sketch the in-betweens to polish the transitions between each pose.
The next phase sees that the pencil sketches are sent to an inker once all movement in the shot has been approved.
The inker then applies the linework to a black ink translucent film of thin plastic (the Cel).
Once the ink is dry, a colorist will apply the color on the opposite side to give each cell a sharp finish consisting of clean and accurate line work.
Materials used for Cel Animation
Perhaps the first thing you need to know about cel animation is what materials you must obtain to put it all together.
Since it is an age-old technique and there was negligible technological development, the materials are pretty basic.
As the name implies, cel animation is created on a cel or celluloid. It is a transparent plastic sheet – on which you draw on the front and paint on the rear side. It is for this foundational reason that it serves as the raw material of the cel animation process. Consider it as a piece of paper for any art project.
Evolution of the Cel
The Cel has seen a considerable amount of evolutionary development over the years. This type of animation and the evolution of plastic are closely linked.
The first half of the 20th century saw actual celluloid made from camphor and cellulose nitrate. It was flammable and prone to degradation with age, tending to wrinkle, discolor, and generate toxic gases over time.
Cellulose acetate replaced actual celluloid, as the former was more chemically stable and safer than the latter. The industry subsequently aimed to improve the endurance of cells by shifting to cellulose acetate.
Despite lasting considerably longer than its predecessor, the acetate eventually followed suit in deterioration. Due to its chemical nature released a strongly smelling vinegar that became commonly known as vinegar syndrome.
Cel Paint – What Is It?
The paints animators often use are heavy, opaque acrylics or gauches, known as ‘cel paint.’ But, as the plastic cellulose degraded over time, you guessed it – so did the paint.
As a result, many cells now have’ paint lifting’ occur — a process in which the paint begins to peel off the plastic and crack.
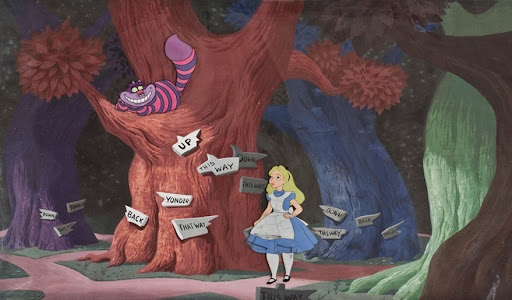
The above image depicts a section of the animation cel from ‘Alice in Wonderland.’ The characters of Alice and the Cheshire Cat have been individually illustrated onto celluloid which has then been placed on the static background. If you look closer, you can see that detail on Alice’s apron appears to be cracked due to paint lifting of the inks.
It was discovered that cellulose acetate was also poor when it came to the preservation of cells. Hydrolysis acquitted acetic acid with time, advancing deterioration of the cels. Polyester eventually replaced Cellulose acetate through trial and error, which was a much better alternative since it did not require any plasticizers.
Going Digital
In today’s constantly-evolving digital world, computers can execute entire animation projects, which, in turn, eradicates the need for cels. As a result, almost all major productions have abandoned cels since the arrival of computer-aided animation applications. Disney Studios, for example, finished using cels in 1990 when Computer Animation Production System (CAPS) replaced this element in their animation process. The following decade would witness other major animation studios phased-out usage of cels animation.
While much of the production process now takes place on computers, most of the principles remain unchanged. Cel animation is an excellent example of how traditional animation techniques remain prominent, even when adapted to function in our new world of technology.
The Cel Animation Process
- Wet Media Film (Cel)
- Acrylic Paint
- Paint Brushes
- Nib and Ink
- Brush Pen
- Pencil
- Colored Pen
- Sketch Paper
- Palette Paper or Mixing Cups
Step One: Sketching
Let’s start with the first and most important part of the entire Cel Animation process – sketching the initial design. Being prepared is of immense importance here.
It helps to begin with fair pencil marks and then gradually build on top of the originals. Make any necessary adjustments, remembering that this design will be traced onto the end film. Being prepared at this phase means that you won’t have to second guess anything later on during the more stringent inking process.
Once you are happy with the preliminary sketches, erase any pencil strokes revealing the refined outlines that will later be replicated on the transparent film.
Step Two: Inking
The next step is to place a piece of paper between the film and your hand before beginning the inking process.
To produce the best lines, maintain consistent pressure on the pen nib at all times, and remember to finish each stroke with a single and complete movement. Practice and patience are needed for this step, so take your time. The colored pen used on the sketch helps to separate the black ink layer on top.
Once you have finished with the inking step, leave some time to let it set aside to dry.
Step Three: Painting
Let’s bring your animation to life! It’s time to flip the film over.
Use the outline colors first, such as black and white, and then transition to the lesser-used colors last to fill in the gaps.
Top tip: for better accuracy, when painting in white, place white under the film.
The ‘float painting method’ in which paint is applied to the surface using a side-loaded brush should coat over the film to the acrylic puddle on top. This method takes an immense amount of practice and patience. The paint is picked up one edge of the brush and then blended thoroughly on the palette until the color has transitioned across the brush to fade before reaching the opposite side gradually.
The next step is to paint in the colors one at a time and let adjacent colors dry in aversion to a mixture of the colors.
Elementary school teachings come in hand here: it is essential to stay between the lines as much as possible.
Once every color has been painted, inspect that each painted segment is opaque enough. It will often be the case that you will need to apply another layer of paint so that the background isn’t visible later.
Step Four: Filling In The Background
Traditional backgrounds can be painted in a variety of mediums: but most prominently, acrylic and gouache. Don’t let the background steal any attention away from your cell. Be creative but subtle. Instead, let it simply set the mood for your design.
Ensure that the colors you choose for the background do not conflict with any major characters or objects you are aiming to include within the Cel.
Step Five: Finishing Touches
Once the ink and paint have dried, your technical job is done.